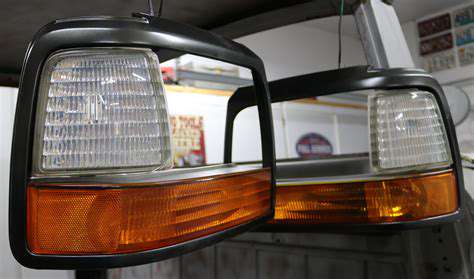
Preventing Further Deterioration
Think of headlight oxidation like tooth decay - ignore it and the problem only grows worse. What starts as slight yellowing can progress to deep cracks and eventual moisture intrusion. Polishing acts like dental cleaning for your headlights, removing surface damage before it penetrates deeper. That $20 polishing kit today could save you $400 in headlight replacements tomorrow.
The protective clear coat on modern headlights is surprisingly thin. Once it's compromised, UV rays and road chemicals attack the plastic relentlessly. Regular polishing maintains this protective barrier like sunscreen for your car's eyes.
Restoring Original Clarity
Remember how your headlights looked fresh from the dealership? That's not gone forever - it's just hiding under layers of environmental abuse. Road grime, acid rain, and UV radiation team up to create that frustrating foggy film. Proper polishing strips away years of accumulated damage, revealing the optical-grade clarity that engineers originally designed.
The transformation can be shocking. Suddenly, your nighttime driving feels safer, distances appear shorter, and colors look more vibrant. It's like getting prescription glasses after years of squinting.
Cost-Effectiveness of Polishing
Dealerships love to sell entire headlight assemblies at premium prices, but most drivers don't need replacements - they need restorations. A quality polishing kit costs less than dinner for two, yet can extend your headlights' life by years. Even professional detailing services typically charge a fraction of replacement costs.
Consider this: the average headlight polish takes about an hour, while replacement requires disassembling half the front bumper. Which sounds like a better use of your Saturday afternoon?
Enhanced Safety Features
Modern adaptive headlights and LED arrays are technological marvels - when they can see clearly. Cloudy lenses turn these advanced systems into expensive paperweights. Polishing ensures your car's sophisticated lighting can perform as engineers intended, reacting to steering input and road conditions with precision.
It's not just about seeing better - polished headlights help other drivers see you sooner and more clearly. In emergency braking situations, those extra milliseconds of visibility could be priceless.
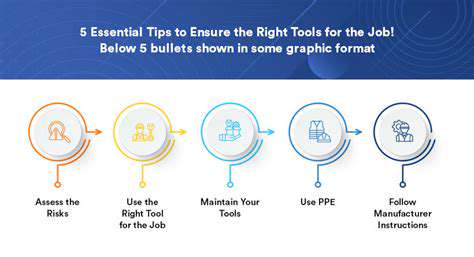
Gathering Your Supplies: Essential Tools for the Job
Planning Your Project
Jumping into headlight restoration without preparation is like baking a cake without checking your ingredients. First, assess how bad the damage really is - are we talking light haze or deeply etched yellowing? This determines whether you need heavy-duty sandpaper or just a polishing compound. Create a mental map of your attack plan before touching your headlights.
Pro tip: Check weather forecasts. Polishing outdoors in direct sunlight or before rain is asking for trouble. Ideal conditions matter more than you'd think.
Choosing the Right Materials
Not all polishing kits are created equal. The market floods with gimmicky solutions, but look for products specifically mentioning UV protection - this isn't just about shine, but lasting results. For severely oxidized lights, you'll need a multi-stage system with progressively finer abrasives, much like how jewelers polish diamonds.
Avoid the temptation to use household items like toothpaste (despite what YouTube might suggest). Proper automotive-grade compounds contain specific polymers and UV inhibitors that consumer products lack.
Essential Tools for the Job
Beyond the polish itself, you'll need: microfiber towels (lots of them), painter's tape, a spray bottle with distilled water, and most importantly - proper lighting to inspect your work. A headlamp or work light lets you spot imperfections invisible in garage shadows. If using power tools, variable-speed polishers prevent melting plastic with excessive heat.
Don't forget nitrile gloves - some compounds stain hands for days. And keep isopropyl alcohol handy for final cleaning before sealing.
Safety Considerations
This isn't brain surgery, but basic precautions prevent headaches. Always tape off surrounding paint unless you enjoy hours of wax removal afterward. Safety glasses stop flying polish debris from becoming eye emergencies. If using power tools, secure long hair and loose clothing.
Work in a well-ventilated area - some compounds release strong fumes, especially when heated by friction. Your lungs will thank you.
Storage and Organization
Create a dedicated workspace with all materials within arm's reach. Nothing kills momentum like searching for that one towel buried under junk. Use a muffin tin or ice cube tray to organize different grit sandpapers - it keeps them separated and visible. Label everything clearly to avoid mixing up compounds.
Keep a trash bin nearby for used towels and tape. A clean workspace means fewer contaminants getting into your freshly polished surfaces.
Budgeting and Resource Management
Quality doesn't always mean expensive. Often, buying individual components separately costs less than pre-packaged kits with unnecessary extras. Check auto parts stores for open-box specials on polishing pads. For casual users, sharing supplies with a neighbor cuts costs for both parties.
Remember: the most expensive option isn't necessarily best for your specific needs. A $5 microfiber towel can outperform a $20 specialty cloth if you know what to look for.
Ordering and Procurement
Online shopping offers convenience but watch shipping costs on liquids. Local auto parts stores often price-match Amazon while letting you inspect products firsthand. For last-minute needs, hardware stores carry suitable alternatives in their automotive sections.
If ordering specialty items, check return policies - some abrasives can't be returned once opened, even if unsuitable for your project.
Preparing the Headlights for Polishing: A Step-by-Step Approach
Understanding the Importance of Headlight Polishing
Imagine trying to watch TV through a dirty window - that's essentially what driving with foggy headlights feels like for your car. The light output from even premium bulbs gets scattered and diminished by surface imperfections. Polishing removes these optical obstacles, letting your headlights perform as intended by their designers.
Beyond lumens and lux, there's a psychological factor too. Clear headlights subconsciously signal well-maintained vehicle to other drivers, potentially affecting how they interact with you on the road.
Gathering Your Supplies: Essential Tools and Materials
Assemble your arsenal like a surgeon prepping for operation. Along with standard supplies, include a plastic razor blade for stubborn residues and a detailing brush for crevices. Have multiple grades of sandpaper ready - starting around 800 grit for heavy oxidation up to 3000 for final smoothing.
Unexpected but useful: a black marker helps track which areas you've sanded by coloring the surface beforehand. When the marker disappears, you've sanded evenly.
The Polishing Process: A Step-by-Step Guide
Start by washing with dawn dish soap - it cuts grease better than car wash solutions. Once dry, the real work begins. Use the crosshatch method when sanding - alternate directions with each grit to ensure even material removal. Keep the surface lubricated with soapy water to prevent clogging the sandpaper.
When moving to polish, work small sections methodically. Watch for the magical moment when the compound turns clear - that's your signal to buff. Patience here separates adequate results from show-quality finishes.
Finishing Touches: Protecting Your Polished Headlights
The polish itself is only half the battle. Applying a UV-resistant sealant is like sunscreen for your freshly rejuvenated lenses. Ceramic coatings offer superior longevity but require precise application. For DIYers, a quality automotive wax applied monthly works surprisingly well.
Pro tip: After sealing, occasionally wipe headlights with isopropyl alcohol to remove road film before it bonds permanently. This simple habit extends time between major polishing sessions.
The Polishing Process: Achieving a Brilliant Shine
The Initial Assessment
Run your fingernail across the headlight surface - if it catches, you're dealing with deep scratches needing aggressive treatment. Different damage types require tailored approaches: oxidation needs compounding, while etching requires wet sanding. Take before photos from multiple angles; the transformation will shock you later.
Preparing the Surface
Skip this step and you're polishing dirt into the lens. Use isopropyl alcohol for final cleaning - water leaves minerals that interfere with polishing. Pay special attention to edges where grime accumulates. Any remaining contaminants will become permanent scratches under the polisher.
Selecting the Right Polishing Compounds
Match the compound to your headlight material - polycarbonate reacts differently than glass. For modern plastic lenses, look for non-silicone formulas that won't cloud over time. Heavy-cut compounds remove material quickly but require follow-up with finer polishes to eliminate haze.
Applying the Polishing Compound
Less is more - a pea-sized amount goes further than you'd think. Work in overlapping two-foot square sections, keeping the pad flat to avoid edge digging. If the compound dries, stop immediately - dry polishing creates more problems than it solves.
Monitoring and Adjusting the Process
Frequent wipe-downs with isopropyl alcohol reveal true progress beneath polishing residue. If certain areas resist improvement, mark them with painter's tape for targeted attention. Persistent spots might indicate deeper damage requiring professional intervention.
Evaluating the Final Result
View the headlight from multiple angles under different lights - what looks perfect in the garage might show flaws in sunlight. Check light output by comparing to an unpolished headlight at night - the difference validates your effort.
Maintaining the Polished Surface
Apply a ceramic coating if possible - it creates a sacrificial layer that takes environmental abuse instead of your polish. Monthly wax applications add protection, while quick detailer sprays remove daily contaminants. Avoid automatic car washes with harsh chemicals that strip protective layers.